You spent the weekend transforming your lounge, only to find unsightly blisters marring your fresh accent wall on Monday morning. While seeing your hard work distort is discouraging, if you're wondering how to fix paint bubbling after a fresh coat, you don't need to strip the entire room to correct the mistake. Paint bubbling — technically known as blistering — is essentially a failure of adhesion, or the "grip" paint has on a surface. Most grip failures stem from three specific culprits: trapped moisture, extreme heat, or hidden contaminants like grease. By following a clear troubleshooting process, you can repair the localised damage and ensure your next coat locks on permanently.
Blistering vs. Peeling: Identifying Your Specific Paint Failure
While both issues indicate that your topcoat has lost its grip, knowing the difference between blistering and peeling saves time during repair. Blisters usually appear as a rash of small, rounded bumps, signaling that heat or moisture is actively pushing the paint away from the wall. Peeling, by contrast, often involves larger sheets detaching, much like an old sticker falling off because it was applied over a dusty or greasy surface.
Resist the temptation to simply roll a fresh coat over these imperfections. New paint adds weight and moisture, which pulls the loose section further from the plasterboard rather than flattening it out. To fix bubbling paint effectively, you must treat the bubble as "dead" surface area that needs removal before rebuilding.
Inspect the damage pattern to determine if this is a spot repair or a whole-wall project:
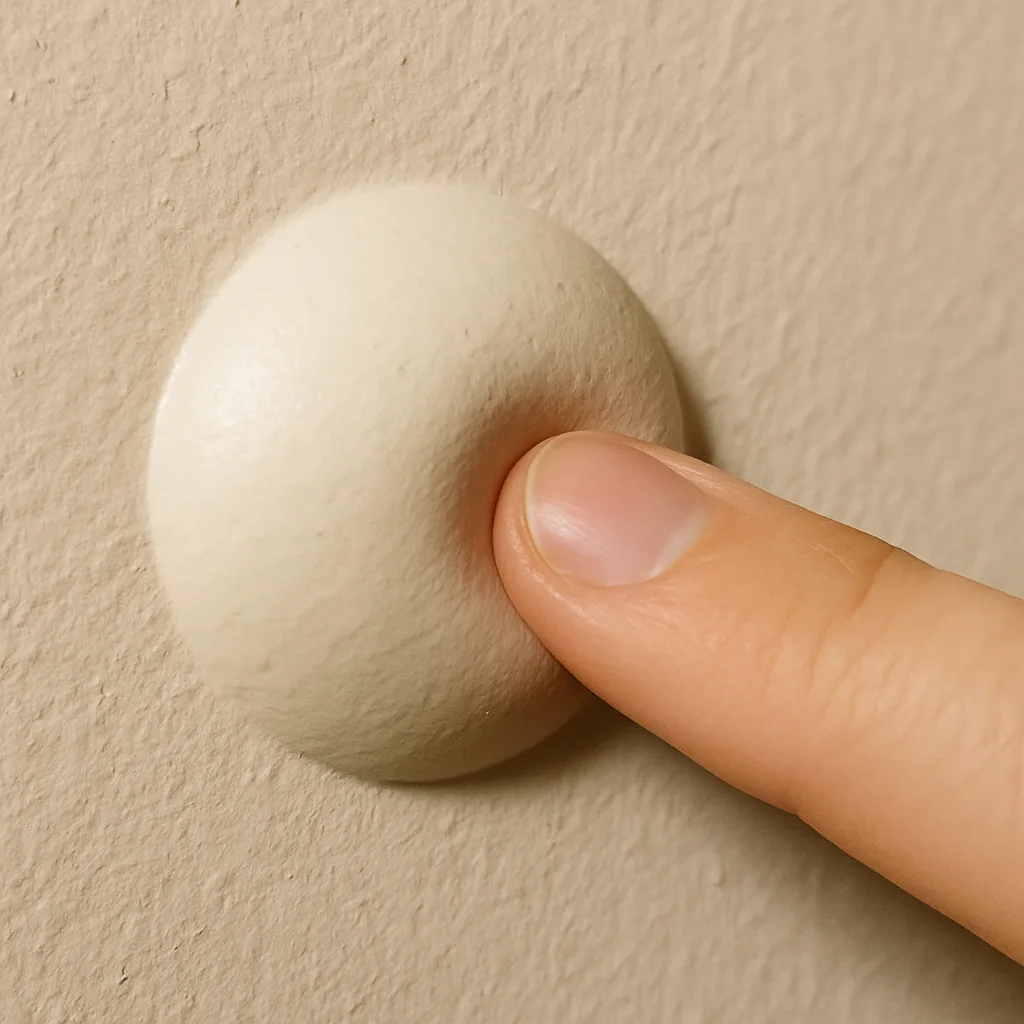
- Blisters — Spongy, round, or fluid-filled bumps (usually caused by trapped moisture or heat)
- Peeling — Flaking edges or lifting strips (usually caused by dirt, grease, or missing primer)
If your inspection reveals spongy, fluid-filled bumps, you are likely dealing with the most common bathroom enemy: invisible humidity.
The 'Steam Room' Effect: Why Moisture Is Your Paint's Worst Enemy
Painting a damp surface is like trying to adhere a label to a sweating glass — it simply won't hold. In high-humidity areas like bathrooms, water vapour often gets trapped between the plasterboard and your fresh topcoat. As the room warms up, that trapped moisture expands, pushing the paint film outward to create a bubble. This commonly happens if you paint too soon after showering or if the room lacks proper ventilation, creating a cycle where the paint never truly bonds because water occupied the space first.
External sources of water are even more aggressive. When moisture seeps through concrete foundations or porous cladding, it creates a force known as hydrostatic pressure. This is a primary cause of exterior paint blistering, as the sun heats the trapped water, turning it into vapour that effectively blows the paint off the substrate.
Before planning your repairs, gently press the bubble to check its contents. If water oozes out, you have an active plumbing leak or roof issue that must be fixed before you pick up a scraper. If the blister is dry and hollow, the culprit was likely temporary humidity or heat during the original application. Once the moisture source is resolved, you are ready to gather the right equipment to remove the damage permanently.
Your Anti-Bubble Toolkit: Essential Gear for a Permanent Fix
Successful repairs rely more on preparation than painting. To start, use a flexible 25mm to 50mm filling knife rather than a stiff scraper; removing paint requires a gentle touch to lift debris without gouging the plasterboard behind it. Once the loose material is gone, you will need 120-grit sandpaper to smooth the rough edges where the old paint meets the wall. This step creates a gradual slope so your patch blends invisibly rather than leaving a harsh ridge.
Dust is the invisible barrier that ruins adhesion, so a standard rag is insufficient. Proper surface preparation demands a tack cloth — a sticky, open-weave rag that lifts fine powder like a magnet instead of just pushing it around. Finally, acquire a high-quality stain-blocking primer to seal the exposed surface before your topcoat goes on. Having these specific items ready ensures the job lasts:
- Flexible Filling Knife (25–50mm blade)
- 120-Grit Sandpaper or sanding sponge
- Tack Cloth (for dust removal)
- Stain-Blocking Primer
The Scrape, Sand, and Smooth Method for Flawless Repairs
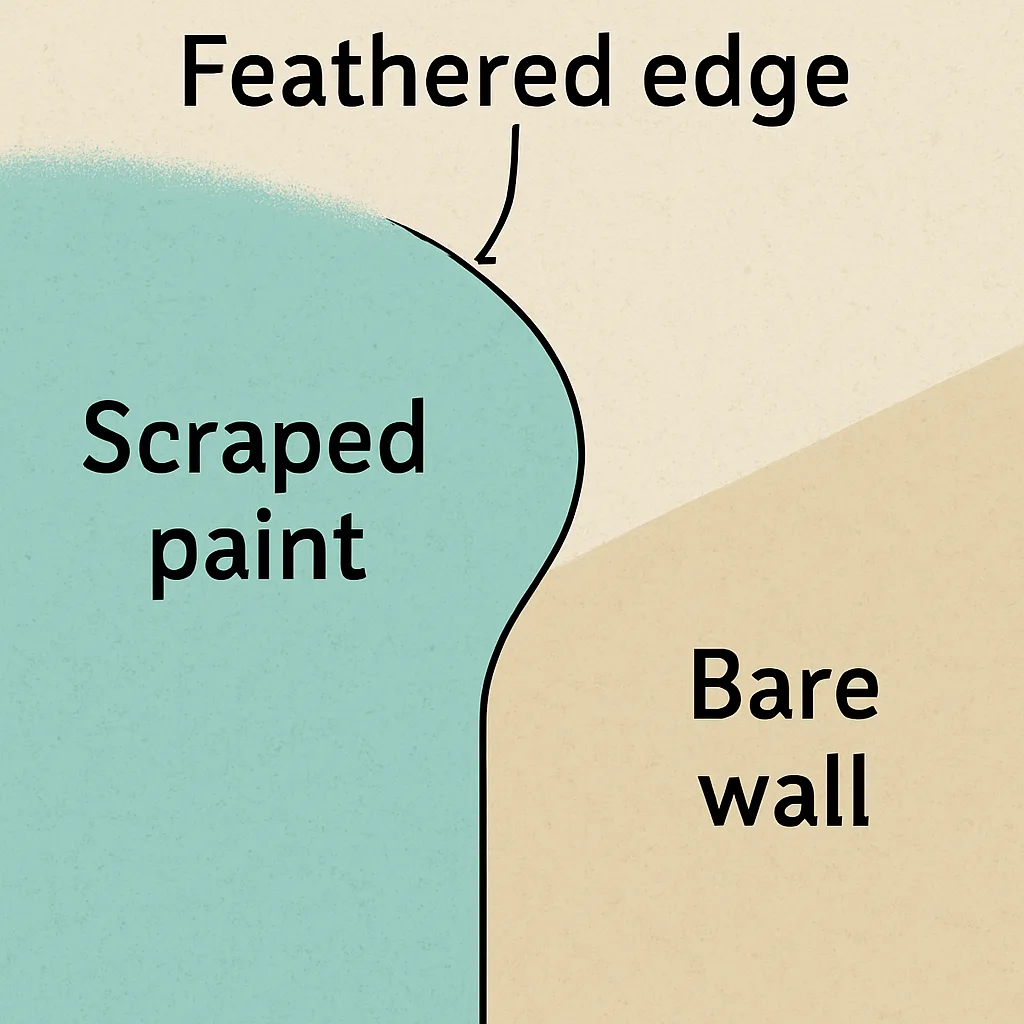
Begin by gently inserting your flexible filling knife under the blistered edge to lift away the compromised material. This is "dead paint" — it has lost its bond with the plasterboard and cannot be saved; effective repair requires removing it entirely. If you skip this removal, the new paint will simply pull the old, weak layer off the wall again. Continue scraping until the remaining paint firmly resists your knife, leaving a clean area of bare wall surrounded by a solid perimeter of coating.
-
Scrape away all loose paint Use a flexible filling knife to gently lift away the blistered material. If the paint resists your knife, it's still well-bonded and can stay. Only remove what comes away easily — this is "dead paint" that has lost its grip.
-
Feather the edges smooth Use 120-grit sandpaper to sand the hard edge where the paint meets the bare wall. Rub in a circular motion until your finger can slide from the exposed wall onto the painted surface without feeling a distinct ridge or "step." This feathering technique is what makes the repair invisible once painted over.
-
Remove all dust with a tack cloth Residual dust acts like microscopic ball bearings that prevent your new repair materials from sticking. Wipe the entire area thoroughly with your tack cloth to remove the fine powder generated by sanding.
Sometimes this process reveals a depression deeper than a sheet of thick card, which sanding alone cannot hide. In these cases, apply a thin layer of filler (jointing compound) to fill the void, let it dry, and sand it flush. However, for shallow repairs that only removed a single layer of emulsion, the feathering step is usually sufficient to hide the transition once the primer is applied.
Solving the 'Oil vs. Water' Conflict: Why Your Primer Choice Matters
Applying new paint directly over incompatible old layers guarantees failure, particularly in older homes where painting emulsion over oil-based finishes creates a slick barrier that repels water-based coatings. Identify the existing surface with a simple test: rub the wall with a cotton ball dipped in methylated spirits. If paint dissolves onto the cotton, it is water-based; if the cloth stays clean, you are dealing with an oil-based finish that requires a specialised transition layer.
Bridging the gap between these materials requires a bonding primer that acts like double-sided tape. Unlike standard sealers designed solely for porous plaster, these formulas are engineered to grip glossy enamel while providing a stable, textured base for your new topcoat. When comparing oil-based vs water-based primers, always choose a high-bond product labelled "universal" to prevent the chemical rejection that leads to future blistering.
This undercoat also serves as a shield against humidity, which is critical if your original damage occurred in a steam-heavy environment like a bathroom. Selecting a primer with high moisture resistance locks out water vapour that would otherwise penetrate the patch and push the repair off from the inside. Once this essential "glue layer" is applied, resist the urge to rush; trapping moisture between coats is the final trap to avoid.
Mastering Drying Times and 'Flashing' to Prevent Future Bubbles
Rushing the process is the fastest way to ruin your repair. While a surface might feel ready to the touch, the solvents — the liquid carriers in the paint — are likely still evaporating from the layers underneath. If you apply a second coat too soon, you trap those vapours. The top layer skins over, but the gas beneath pushes outward, creating new blisters before the project is even finished.
True adhesion requires patience, not just dry air. Use these adjusted baselines:
- Water-Based Primer: Wait 3–4 hours at standard room temperature
- Oil-Based Primer: Allow a full 24 hours to off-gas completely
- High Humidity: Add 2 hours to any recommendation if the room feels damp or poorly ventilated
Skipping these windows triggers "flashing," where escaping gas forces the semi-dry topcoat to blister. Ensure the bottom layer is fully cured — meaning it has hardened completely rather than just dried on the surface.
What Is Flashing?
Flashing is when patched areas dry to a slightly different sheen than the surrounding wall, creating visible glossy or matte patches. This happens when primer or topcoat is applied at inconsistent thicknesses. To avoid it, apply even, uniform coats and always prime the entire repair area — not just the bare spot.
Exterior Paint Blistering: Managing Sun, Heat, and Substrate Temperature
While rushing ruins indoor jobs, the sun is the main enemy outside. Painting a wall baking in direct sunlight causes the top layer to dry instantly while the bottom remains wet. This traps vapours that expand, creating heat blisters. One of the most common causes of exterior paint blistering is simply applying product to a hot surface.
Colour choice and timing are equally critical. Dark paints absorb more heat than light shades, increasing expansion risks, while painting too early over morning dew traps moisture against the cladding. To prevent this, use the "follow the shade" rule — working only on cool walls. Professional painters manage this by following the shade around the building, painting east-facing walls in the afternoon and west-facing walls in the morning.
Addressing these blisters requires scraping down to bare wood and sanding the edges smooth. However, you can only permanently fix the issue if you apply the repair during moderate weather.
From Repair to Perfection: Your Long-Term Wall Maintenance Plan
Seeing bubbles on a fresh coat of paint is no longer a disaster — it is simply a signal that the surface needed more attention. Now that you understand the mechanics of adhesion, you can stop troubleshooting and start repairing with confidence. Whether the culprit was moisture or dust, you have the skills to smooth out imperfections and achieve the seamless blending usually reserved for professionals.
Your "Never-Bubble" Checklist:
-
Clean walls with a degreaser Remove hidden oils and contaminants that sit invisibly between paint and surface. A sugar soap wash followed by a clean water rinse is the gold standard.
-
Ensure the room is dry and humidity is low Run exhaust fans or open windows to bring humidity below 50% before applying paint. High moisture in the air slows drying and increases the risk of trapping vapour.
-
Scrape and sand loose edges until feather-smooth Any existing paint that isn't firmly adhered will take the new coat down with it. Test adhesion by pressing tape firmly onto the surface and pulling it away — if paint comes off, that area needs scraping.
-
Apply a high-quality primer to lock down the surface Primer is not optional on bare or repaired surfaces. It creates the adhesion bond that topcoat paint alone cannot achieve on porous or previously damaged substrates.
-
Allow full drying time between every coat This single habit prevents the majority of recoat failures. Check the manufacturer's recommended recoat window and add extra time in cool or humid conditions. Understanding what goes into a quality paint job helps you appreciate why patience pays off.
Your next renovation won't just look better; it will last longer. By mastering surface preparation for interior walls, you have graduated from simply applying colour to truly maintaining your home.
Frequently Asked Questions
Paint bubbles (blisters) when the new coating loses adhesion to the substrate — most often from trapped moisture, excessive heat, or hidden contaminants like grease or dust. Inspect the pattern: small, rounded, sometimes spongy or fluid-filled bumps point to heat or moisture; larger sheets lifting (peeling) suggest dirt, grease, or missing primer. Gently press a blister — if water oozes out, fix the active leak or humidity source first.
No. Painting over bubbles adds weight and moisture, which pulls the loose section further from the wall. Treat the bubbled area as "dead paint": scrape until only firmly bonded coating remains, feather the hard edge with 120-grit sandpaper, remove all dust with a tack cloth, prime the exposed area, then repaint.
Use a flexible 25–50mm filling knife to gently lift away loose paint without gouging the substrate, 120-grit sandpaper (or a sanding sponge) to feather edges, a tack cloth to remove fine dust that ruins adhesion, and a high-quality stain-blocking primer to seal and lock down the repair. Have filler on hand if the scraped area sits noticeably below the surrounding surface.
Test the existing paint with a cotton ball dipped in methylated spirits: if colour transfers, it's water-based; if not, it's likely oil-based. To bridge old oil to new water-based coatings (or any unknown, glossy surface), use a high-bond "universal" bonding primer. In moisture-prone areas (like bathrooms), pick a primer with strong moisture resistance to block vapour and prevent future blistering.
Let water-based primers dry 3–4 hours and oil-based primers a full 24 hours; add about 2 hours in high humidity. Rushing traps solvents and causes "flashing," where vapours blister the semi-dry topcoat. Outside, avoid painting hot surfaces or in direct sun — follow the shade, beware morning dew, and note that dark colours absorb more heat and raise blister risk.
Have More Questions?
Get in touch with our Melbourne painters. We'll answer any questions and provide a free, no-obligation quote within 24 hours.
Contact NowWhen to Call a Professional
Small, isolated blisters on a single wall are manageable as a DIY repair. But if bubbling is widespread across multiple walls or rooms, or if the same area keeps blistering after repeated repairs, there's likely a deeper moisture or substrate issue that needs professional diagnosis.
At Modernize Solutions, we see paint bubbling regularly across Melbourne homes — particularly in older properties, bathrooms, and exterior walls exposed to weather. We identify the root cause, carry out the full scrape-sand-prime repair process, and use premium quality products that deliver lasting results. If your walls are bubbling and you're not sure where to start, get in touch for a free assessment.