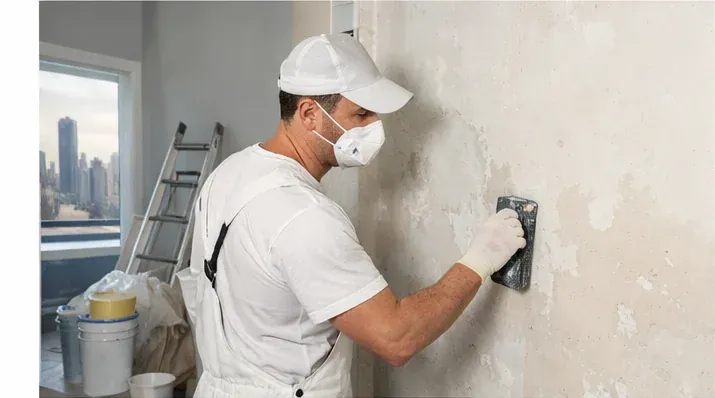
Preparation is the part of painting that most homeowners underestimate and most cheap painters skip. A paint finish is only as good as the surface beneath it. The best quality paint applied over dirty, cracked, or unprepared walls will fail within a few years — peeling, cracking, and showing every flaw that wasn’t fixed before the paint went on. Professional painters in Melbourne typically spend 30–50% of a project’s time on preparation before they open a single tin of paint. This guide walks through every step of proper wall preparation for painting so you know what to expect — and what to ask for — when you hire a painter. Whether you’re handling a small room yourself or briefing a tradie, understanding wall preparation before painting will save you money and headaches down the track.
How to Prepare Walls for Painting: Quick Answer
Wall preparation for painting involves 6 key steps: clean the surface with sugar soap, fill all holes and cracks with appropriate filler, sand smooth once dry, treat any mould or stains with a suitable primer or sealer, mask edges and fixtures, and apply a primer coat to new or bare surfaces before the topcoat.
Why Wall Preparation Matters More Than the Paint
Most homeowners focus on paint colour and sheen level. Professional painters focus on the wall surface first — because the surface determines everything else.
- Paint is a coating, not a filler. It follows the surface beneath it exactly — every crack, bump, ridge, and contamination shows through the finish, sometimes immediately and sometimes as the paint ages and slight sheen differences become more visible in raking light.
- Dirty walls cause adhesion failure. Grease, dust, nicotine, and cleaning product residue all prevent paint from bonding to the substrate properly. The result is paint that peels or flakes within 12 to 18 months, starting at the areas of highest contamination.
- Skipped repairs telegraph through paint. A filled but unsanded hole shows up as a bump under the finish. An unfilled hole shows up as a shadow. A hairline crack painted over without treatment will reappear through the new paint film within months.
- Priming is not optional on bare surfaces. Primer seals porous substrates, evens out the absorption rate across the wall, and gives topcoats a consistent base to bond to. Skipping primer on new plaster or bare timber leads to uneven sheen and poor durability.
Key takeaway
The professional rule:never paint a dirty wall, never paint over a crack, never paint a bare surface without primer. Violating any of these rules eventually results in a failed paint job — it's not a question of if, only when.
Wall Preparation Step by Step
This is the full sequence used by professional painters for interior painting projects. Each step builds on the last — shortcuts at any stage compromise the result.
-
Step 1: Clear the Room
Move furniture to the centre of the room or out entirely. Remove all switch plates, power point covers, picture hooks, curtain hardware, and nails. Lay drop sheets over floors and any furniture that remains. Removing switch plates and power point covers takes only a few minutes with a flat-head screwdriver and ensures clean edges when cutting in around them later. Any hardware left in place creates obstacles that slow prep work and paint application.
-
Step 2: Clean the Walls
Wash all surfaces with a sugar soap solution using a sponge or cloth, working from the top of the wall downward. Sugar soap is an alkaline cleaner that removes grease, dust, nicotine, cooking residue, and general grime — all of which prevent paint from bonding to the wall. This step is one of the most commonly skipped in budget paint jobs, and it is one of the top causes of premature paint failure.
For kitchens, pay particular attention to any wall area adjacent to cooking surfaces where airborne oil residue accumulates. For living rooms or bedrooms in older homes, light nicotine staining may not be visible but will still cause adhesion problems. Allow walls to dry completely — at least 2 to 4 hours — before proceeding to the next step.
-
Step 3: Treat Mould and Mildew
Any visible mould must be treated before painting — painting over mould does not kill it and it will grow back through the new paint film. Wipe the affected area thoroughly with a diluted bleach solution (1 part bleach to 4 parts water) using a cloth or sponge, then allow to dry completely. Once dry, apply a mould-resistant primer or a dedicated mould and mildew sealer before topcoating.
For extensive mould — anything more than a small localised patch — the underlying moisture source should be identified and rectified before painting. Common sources in Melbourne homes include inadequate bathroom ventilation, leaking gutters or roof flashings, and rising damp in older unrenovated properties.
-
Step 4: Fill Holes and Cracks
This is where the quality of a paint job is largely determined. Use a premixed filler such as Selleys Spakfilla for small nail holes, picture hook holes, and minor surface cracks. Apply with a putty knife, slightly overfilling the void, then scrape flush. For larger holes or damaged sections of plasterboard, use a setting-type compound such as Gyprock Joint Compound, which is harder and more durable once cured.
For cracks that move — hairline cracks along plasterboard joins, cornice lines, or around window and door frames — use a flexible acrylic sealant (Selleys No More Gaps or equivalent) rather than a hard-setting filler. Hard filler applied in a moving crack will crack again, usually within the first year. Flexible sealant moves with the building and maintains a sealed appearance.
In older Melbourne homes, particularly pre-1980 weatherboard and brick homes, there may be significant patching required around doorframes, architraves, and skirting boards where movement has occurred over decades. Allow adequate time for this step — it cannot be rushed.
-
Step 5: Sand Smooth
Once all filler is fully dry, sand repaired areas smooth using 120-grit sandpaper. The goal is to feather the edges of each repair so it blends seamlessly into the surrounding wall surface — a repair that is left proud of the wall will be visible as a raised area under the finished coat. Use a flexible sanding block to conform to slight surface curves.
Beyond sanding repairs, run a light all-over sand of all wall surfaces using a pole sander with 120-grit. This improves adhesion across the entire surface, which is particularly important on walls previously painted in semi-gloss or gloss finishes where the surface is smooth and non-porous. Wipe down all sanding dust with a damp cloth or vacuum with a brush attachment before priming.
-
Step 6: Seal Stains
Standard topcoat paint cannot cover water stains, nicotine staining, or smoke damage — these bleed through even multiple coats of paint. Water stains (the brown ring marks left by old roof leaks or plumbing leaks) and heavy nicotine must be sealed with a dedicated stain-blocking product before any topcoat goes on.
For moderate staining, Dulux Aquanamel or a similar water-based stain blocker can be effective. For heavy staining — extensive nicotine, fire damage residue, or particularly stubborn water marks — a shellac-based primer such as Zinsser B-I-N provides the most reliable block. Shellac-based primers dry fast and provide an almost impenetrable barrier against bleed-through. Note: shellac-based primers are solvent-based and require proper ventilation.
-
Step 7: Mask Edges
Apply low-tack masking tape to edges where walls meet ceilings, cornices, timber trim, window frames, and door architraves — anywhere the wall colour ends and another surface or colour begins. Press the tape edge down firmly with a putty knife or your thumbnail to prevent paint from bleeding underneath.
For experienced painters, a “speed-cut” approach using a quality cutting-in brush without masking tape often produces cleaner, sharper lines than tape — tape can lift paint if left too long or pulled at the wrong angle. However, for DIY work or when working close to freshly painted trims, tape provides a reliable safety net.
-
Step 8: Prime
Apply a primer coat to all bare or newly repaired surfaces. For previously painted walls in good condition with no bare patches, a light sand and quality topcoat is generally sufficient. The key situations requiring primer are: new plaster or plasterboard, filled repairs (spot prime at minimum), bare timber, surfaces switching from oil-based to water-based paint systems, and walls with staining that has been sealed.
Allow primer to dry fully according to the manufacturer’s directions — typically 2 to 4 hours for water-based primers — before applying topcoat. Rushing the prime-to-topcoat window results in blistering and adhesion problems. This is the final preparation step before residential painting topcoats can begin.
Wall Preparation for Different Surface Types
The prep sequence above applies to standard painted walls in reasonable condition. Different surface types require specific additional steps — and some surfaces, such as walls with existing wallpaper, have their own preparation pathway covered in our guide to painting over wallpaper.
New Plaster or Plasterboard
New plaster and new plasterboard are highly porous and will absorb topcoat unevenly without priming, resulting in flat spots, uneven sheen, and visible roller lap marks. Always prime with either a diluted PVA solution (3 parts water to 1 part PVA) applied as a sealer coat, or a dedicated new plaster primer. Allow to dry fully. New plaster also requires adequate curing time — typically 4 to 6 weeks for wet-applied render — before painting.
Previously Painted Walls (Water-Based Over Water-Based)
The most straightforward situation. Clean with sugar soap, fill and repair any damage, sand repaired areas, and spot-prime bare patches. A full primer coat is not usually needed if the existing paint is sound and well-adhered. A quality water-based topcoat over a properly cleaned and sanded previously painted surface will adhere reliably.
Previously Oil-Painted Walls
Common in Melbourne homes painted before 2000, when oil-based enamel paints were standard for walls and trims. Applying water-based topcoat directly over glossy oil-based paint without preparation will result in peeling — sometimes within weeks. The correct process is to sand the surface thoroughly to break the gloss, clean off the sanding dust, and apply an adhesion primer or water-based primer specifically formulated for use over oil-based surfaces before topcoating.
Heritage Lime Plaster Walls
Many Melbourne homes built before 1960 have original lime plaster walls rather than modern gypsum plaster. Lime plaster is softer, more breathable, and more reactive to moisture than gypsum. The key difference for painting: use a breathable, water-based primer rather than a sealing primer. A hard sealing primer on lime plaster can trap moisture vapour behind the paint film, leading to bubbling and delamination. If in doubt, consult a painter experienced with heritage exterior painting and period interiors.
Brick or Masonry Walls
Interior brick or masonry walls (exposed brick features, concrete block, rendered surfaces) require surface cleaning with a stiff brush to remove loose mortar, dust, and efflorescence (the white salt deposits that form on masonry). Fill any significant voids with a suitable mortar or masonry filler. Apply a masonry sealer or Dulux Concrete and Masonry primer before topcoat to even out the highly variable absorption of masonry surfaces.
Common Wall Preparation Mistakes
These are the errors that lead to paint jobs failing within 1 to 3 years rather than lasting a decade.
- Painting over dirty walls — the single most common cause of paint failure within 12 months. Grease and grime create a release layer that prevents adhesion, and paint peels off in sheets.
- Using the wrong filler for the situation — hard-setting filler in a crack that moves seasonally will crack again. Soft filler used in a deep void will shrink and leave a depression.
- Not sanding filled repairs — even a slightly proud fill shows up as a bump under paint, particularly in raking light. All fills must be sanded flush and feathered at the edges.
- Spot priming only the visible repairs — creates different absorption levels across the wall that show through the topcoat as areas of uneven sheen, known as “flashing”. The more consistent approach is to prime the entire wall if there are multiple repairs.
- Rushing drying time — painting over wet or incompletely dry filler or primer causes blistering and adhesion failure. Drying times on packaging are minimum times under ideal conditions; allow longer in cold or humid weather.
- Forgetting to clean sanding dust before painting — fine sanding dust sitting on the wall surface acts as a release agent. Always wipe down after sanding before priming or topcoating.
Do-It-Yourself vs Professional Wall Preparation
Whether to DIY the preparation or engage a professional depends on the condition of the walls and the type of property.
DIY prep is entirely feasible for smaller rooms in good condition — a bedroom with a few nail holes, a living room that just needs a clean and sand. The tools are inexpensive and the process is learnable from this guide. Budget several hours for prep before you even open a tin of paint.
Professional preparation is worth engaging for:
- Older Melbourne homes with fragile lime plaster or extensive historical cracking, where incorrect filler choices can cause more damage than the original problem
- Rooms with water damage, active mould, or multiple generations of paint layers that require assessment before treatment
- Properties with significant patching required — filling large holes, repairing damaged plasterboard sections, or re-taping plasterboard joins
- Rooms with detailed cornices, ceiling roses, and complex surfaces where the preparation itself is time-consuming and skill-dependent
Most professional painters charge between $50 and $150 per hour for surface preparation work beyond standard clean-and-fill. When getting quotes, ask for a clear scope of what preparation is included in the base price and what will be quoted separately based on the site assessment — this avoids bill shock when the painter discovers issues not visible until they’re on site.
How Modernize Solutions Approaches Wall Preparation
Modernize Solutions is known among Melbourne homeowners for thorough preparation — not just pointing a roller at a wall. Every job includes a full surface assessment, appropriate repairs, stain sealing, and priming before topcoats go on. We use Dulux premium primers and interior paint systems and are happy to walk through every step of our prep process before starting work, so there are no surprises during the job.
With 30+ years of experience across Melbourne homes — from newer builds in the western suburbs to heritage properties in the inner north and south-east — we know that preparation is what separates a 3-year paint job from a 10-year one. rated 4.8 stars on Google (154 reviews), our reviewers consistently mention the quality of our preparation and finish work. We carry $20M public liability insurance and back every job with a clear scope of work. Call us on 0451 040 396 to discuss your project.
Tools and Materials for Wall Preparation
If you are preparing walls yourself, here is what you need before you start.
Essential
- Sugar soap (powder or liquid) and sponges or cloths
- Premixed filler — Selleys Spakfilla for small holes and surface cracks
- Setting-type compound — Gyprock Joint Compound for larger voids and plasterboard repairs
- Flexible acrylic sealant — Selleys No More Gaps for moving cracks at joins, cornices, and frames
- 120-grit sandpaper sheets and a pole sander for walls
- Stain-blocking primer — Dulux Aquanamel for moderate staining; Zinsser BIN shellac primer for heavy staining
- Appropriate primer for the surface type (new plaster primer, adhesion primer for oil-based surfaces, masonry primer for brick)
- Low-tack masking tape (blue or yellow painter’s tape, not standard masking tape)
- Canvas or plastic drop sheets
- Diluted bleach solution in a spray bottle for mould treatment
Optional but Useful
- Random orbital sander for large areas with extensive preparation needs
- Corner taping knife and fibreglass mesh tape for plasterboard joint repairs
- Flexible filling knife in multiple widths (75mm, 150mm) for smooth fills
- Bright work light or inspection lamp to reveal surface imperfections in raking light before priming
Frequently Asked Questions
Do you need to sand walls before painting?
Yes, in most cases. Sanding filled repairs is essential — unsanded repairs show through paint as bumps or shadows. A light all-over sand with 120-grit also improves adhesion across the whole wall, which is particularly important on glossy or semi-gloss previously painted surfaces. New plaster and bare timber always require sanding before priming. The only scenario where full-wall sanding is not strictly necessary is a flat-painted wall in excellent condition with no repairs, being recoated in the same paint system.
What is sugar soap and why is it used before painting?
Sugar soap is an alkaline cleaning solution used to remove grease, dust, nicotine residue, and general grime from walls before painting. The name comes from its granular appearance in powder form, which resembles raw sugar — it contains no actual sugar. It is one of the most important preparation steps because painting over a contaminated surface is a leading cause of paint adhesion failure. Dilute according to the product instructions, wash the wall from top to bottom, and allow to dry before proceeding. It is available at Bunnings, Dulux Colour Centres, and most hardware stores.
Should I prime walls before painting?
Primer is essential on bare surfaces — new plaster, plasterboard, bare timber, exposed filler repairs, and previously unpainted surfaces all require a primer coat before topcoat. For previously painted walls in good condition, a light sand and a quality topcoat is usually sufficient. The critical exception is switching from oil-based to water-based paint: always apply an adhesion primer first, or the water-based topcoat will peel. Spot priming repairs on otherwise sound painted walls is best practice even when a full prime coat is not required.
How long should you wait after filling before painting?
Premixed filler such as Selleys Spakfilla requires 2 to 4 hours for small repairs under normal Melbourne conditions. Larger fills take longer — always check that the filler has changed from dark to fully light in colour, which indicates complete moisture evaporation. Setting-type compounds like Gyprock Joint Compound can take 4 to 24 hours depending on depth and ambient humidity. Never rush this step: painting over incompletely dried filler causes blistering, adhesion failure, and a finish that will need to be redone. Sand, apply spot primer, allow to dry, and then topcoat.
Can you paint over mould?
No. Painting directly over mould does not kill it — the mould organisms remain viable beneath the paint film and will eventually push through, often within 6 to 12 months. The correct process is to treat the affected area with a diluted bleach solution (1 part bleach to 4 parts water), allow to dry completely, then apply a mould-resistant primer before topcoating with a mould-resistant paint. For any mould growth larger than an isolated patch, the underlying moisture source — poor ventilation, a leaking pipe or roof, rising damp — must be identified and rectified before painting, otherwise the mould will return regardless of the paint system used.
Related Service: Interior Painting
Transform your living spaces with expert interior painting and premium Dulux finishes.
Learn more about our Interior Painting service →Modernize Solutions
Melbourne's most experienced residential painters since 1987.