Peeling paint on weatherboard is not just an eyesore — it's a warning sign that your home's most important shield against Melbourne's weather is failing. This guide walks you through every stage of a professional weatherboard repaint, so you know exactly what's involved, what to watch for, and what a quality result should cost.
Reading the Signs: Is Your Weatherboard Ready for a Repaint?
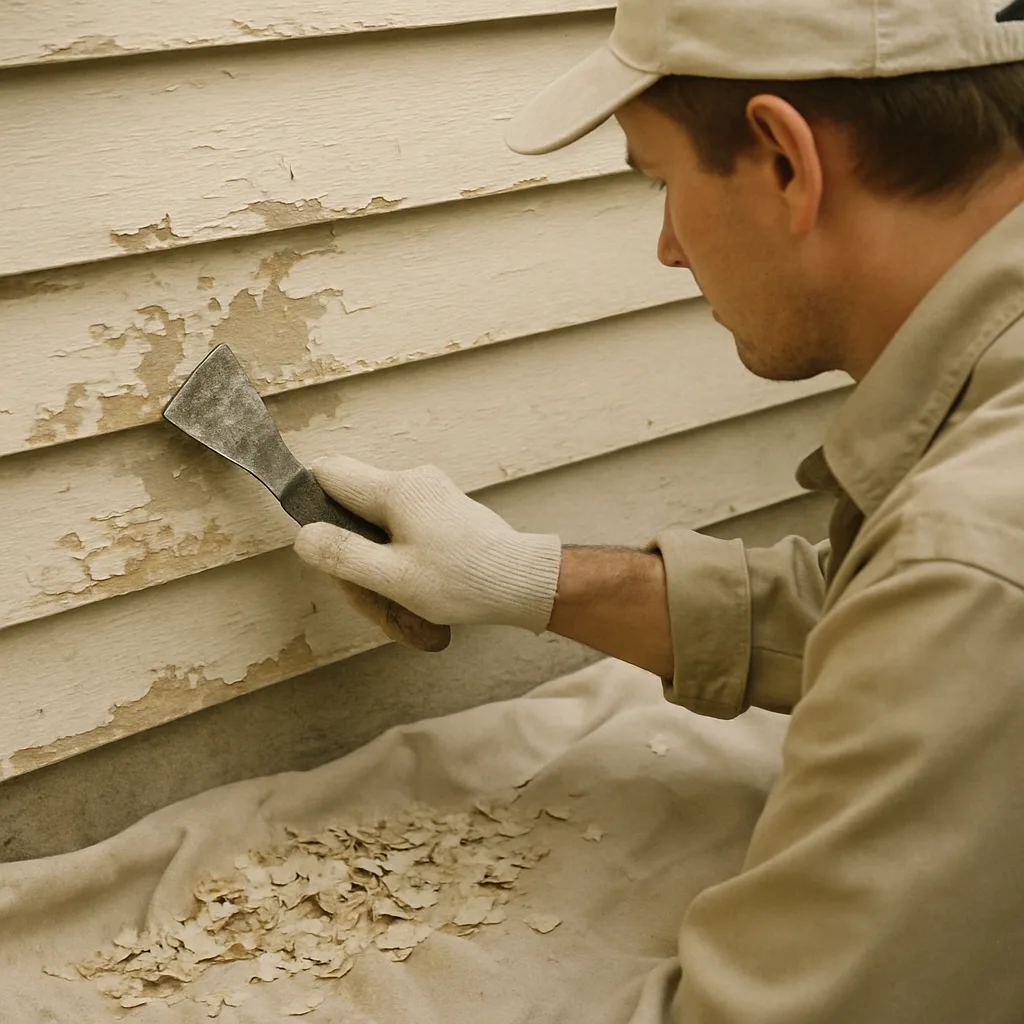
Not all paint failure is equal. Understanding what you're looking at helps you distinguish minor cosmetic issues from serious decay that needs urgent attention. There are four common paint failure signs to look for on your weatherboards:
- Chalking — A fine, powdery residue that rubs off on your hand when you touch the surface
- Alligatoring — Spiderweb or crocodile-skin cracking patterns in the paint film
- Peeling or Flaking — Paint lifting away from the timber, especially on sun-exposed walls
- Bubbling — Blisters beneath the paint surface, which indicate trapped moisture underneath
When more than 20–30% of the home's surface shows these signs, the project is likely too large for a DIY approach. The sheer volume of preparation work — extensive scraping, sanding, and filling — is what justifies professional costs on a job of that scale.
The Critical Safety Check: Does Your Home Have Lead Paint?
Before any scraping begins, homeowners must test for lead paint if their house was built before 1978. While stable lead paint is generally safe to live with, the process of sanding it for repainting creates a fine, toxic dust that is extremely hazardous if inhaled — especially for children and pets.
DIY lead test kits like 3M LeadCheck swabs are inexpensive and simple to use: make a small cut into the paint layers, apply the swab, and a red tip indicates the presence of lead. This quick test is crucial because a positive result changes the entire approach to surface preparation.
If Lead Paint Is Detected
Dry-sanding must not be used. Safe lead paint removal requires wet-sanding (water keeps dust from becoming airborne), proper containment of all debris, and safe disposal. A licensed professional with lead paint experience is strongly recommended.
The 80% Job: Why Perfect Preparation is the Secret to a 10-Year Finish
Professional painters consistently emphasise that 80% of a great paint job happens before a can of colour is even opened. This isn't an exaggeration — meticulous preparation is what separates a finish that lasts a decade from one that starts failing within two years.
The preparation process involves four sequential stages, each one building on the last:
-
Wash the entire house Remove all grime, mould, cobwebs, and surface contamination. You simply cannot paint over dirt — any contamination left behind will prevent the new paint from bonding properly to the surface.
-
Scrape all loose and peeling paint Every section of unstable, flaky paint must be removed. If you paint over an unstable base, the new coat will fall off with the old one within a year or two — no matter how premium the paint you apply on top.
-
Sand the entire surface The most important reason for sanding is to create a "key" — by lightly scuffing the old surface, microscopic texture develops that gives the primer something to physically grip onto. Without this, adhesion is compromised from the start.
-
Fill every gap, crack, and nail hole This is far more than cosmetic — every tiny gap is a potential entry point for rainwater, which gets behind the boards and leads to wood rot. Flexible sealant creates a seamless, weatherproof shield for the timber underneath.
The Unseen Hero: Why You Must Use a Primer Before You Paint
Think of a primer as specialised glue for paint — its one and only job is to create a powerful bond between the surface and everything applied on top. On bare timber, primer sticks to the wood fibres in a way that regular paint simply cannot, providing a stable anchor for the topcoats.
Understanding the difference between products saves money and prevents mistakes:
- Primer — Essential for bare, unpainted materials like raw timber. Its main role is adhesion, not colour build.
- Undercoat — Designed to go over an existing, stable coat of paint to build colour and hide the old shade.
- Primer-sealer-undercoat — Combination products that work well on mixed surfaces with both bare patches and intact existing paint.
Primer also delivers a practical benefit: bare wood is incredibly porous and acts like a sponge, soaking up whatever you put on it. Applying colour directly to bare timber results in a patchy, uneven finish and wastes expensive topcoat paint. A primer seals that thirsty surface, creating a non-absorbent base that dramatically reduces the topcoat volume needed for a flawless, uniform result.
How to Choose the Right Weatherboard Paint Colours (Without Regret)
The secret to avoiding colour regret is not just finding a shade you like — it's seeing how that colour actually behaves in real-world conditions on your specific home. Fixed elements like your roof, brickwork, and window frames must complement whatever colour you choose.
The professional colour-selection method works like this:
- Get test pots of your top colour shortlist
- Paint two large (A4-sized) cards for each colour option
- Tape one card on the sunny north-facing side of your house and one on the shaded south side
- Check both cards at different times of day — morning, midday, and late afternoon
This process reveals a colour's true character. A popular grey might look perfect in full sun but appear cold and purple in afternoon shade. A warm white can read as cream on some walls and bright white on others. Taking this extra step is how you avoid the most common and costly colour mistakes.
Applying the Final Coats: The Secret to a Weatherproof Finish
One topcoat is never enough on weatherboards. The first coat applies colour but often soaks into the primer unevenly, and does not yet provide the durable, protective skin your home's timber needs to survive Melbourne's weather cycles.
The second topcoat delivers both beauty and brawn — it creates the uniform, rich colour you've chosen and, more importantly, builds a thick, flexible barrier against the elements. Two complete coats ensure a durable film with strong UV stability, creating a weatherproof seal that will expand and contract with the timber through seasonal temperature swings without cracking.
For a truly flawless weatherboard finish, professional painters combine spray application with back-brushing — a technique where the paint is physically worked into the timber's grain immediately after spraying for a much stronger bond. Detailed areas, trims, and edges receive hand-brush application to create crisp, clean lines and ensure every gap is perfectly sealed from moisture ingress.
Why Paint Quality Matters on Weatherboards
Premium exterior paints like Dulux Weathershield contain fungicides to fight mould growth on damp, shaded walls and flexible polymers specifically engineered to prevent cracking during Melbourne's temperature swings. This investment turns a cosmetic update into a decade-long shield for your timber.
The Final Result: What a Professional Weatherboard Repaint Costs and How Long It Takes
Understanding what's inside a professional painter's quote removes the guesswork — and helps you identify a quote that's cutting corners. The price reflects the meticulous hours of scraping and sanding, the priming that seals and stabilises the timber, and the skilled two-coat application that delivers a lasting finish.
The specific cost for your home is shaped by three key factors: the overall size of the home, the current condition of the paintwork (the worse the condition, the more prep hours required), and site accessibility (scaffolding requirements on two-storey or elevated homes). Always get at least two written, itemised quotes before committing.
What Modernize Solutions Does on Every Weatherboard Job
At Modernize Solutions, we follow the exact process described in this guide on every weatherboard repaint we complete across Melbourne. We don't cut corners on preparation — it's where the real work happens and where the longevity of the finish is determined, long before the first topcoat goes on.
We use Dulux Weathershield as our premium exterior coating of choice. It's purpose-built for Melbourne's climate, offering UV stability, mould resistance, and the flexible polymer technology that keeps weatherboards protected through years of temperature variation.
If your weatherboard home is showing signs of paint failure, get in touch for a free, detailed written quote. We'll assess the prep work required honestly and give you a clear picture of what a lasting result will involve.